-40%
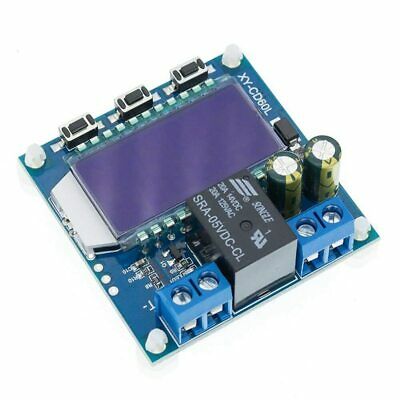
CD60L Solar Battery Charger Controller 12V 24V 48V Charging Discharge Control
$ 4.83
- Description
- Size Guide
Description
1.Description:XY-CD60L is a battery charge and discharge controller module. It can be used for DC 6V~60V any one lithium/lead-acid battery.
2.Features:
1>.Multi-function test instrument
2>.Dual mode work
3>.Support charging protection
4>.Support discharge protection
5>.Support set the charging/discharging time
6>.Automatic detection parameters
7>.HD LCD display
8>.Multi-parameter display
9>.Support power saving mode
10>.Supports automatic battery detection
3.Parameters:
1>.Product name: XY-CD60L Lithium Battery Charging/Discharging Controller
2>.Model: XY-CD60L
3>.Work voltage:DC 6V-60V
4>.Work Temperature:-40℃~85℃
5>.Work Humidity:0%~95%RH
6>.Size:46*45*20mm
4.Function:
1>.Module supports 2 working modes: Charging Control IN and Discharging Control OUT.
2>.Charging Control IN: This mode is used for charging control to prevent overcharging. Display symbol IN indicates charging mode.
3>.Discharging Control OUT: This mode is used for battery discharge control to prevent battery over-discharge and delay battery life. Display symbol OUT indicates discharging mode.
4>.Battery voltage percentage: It is value get from battery voltage V, Lower Limit Voltage Value dn and Upper Limit Voltage Value UP. Calculation formula: V/(UP-dn).
5>.Automatic parameter check: Screen will display and flashing ERR if the Lower Limit Voltage Value dn is more than the Upper Limit Voltage Value UP.
5.Charging Control IN Mode:
1>.Input terminal connect DC 6V-60V charger which use for battery.
2>.Output terminal connect 1pcs DC 6V-60V battery. It will display 0.00V and nbE if the battery does not meet the requirements.
3>.Output turn ON and the input charger starts charging the battery if battery voltage is less than the Lower Limit Voltage Value dn.
4>.Output turn OFF and the input charger stops charging the battery if battery voltage is more than the Upper Limit Voltage Value UP.
5>.The symbol IN will flashing when charging.
6>.Support set parameters:
6.1>.Upper Limit Voltage Value UP: Maximum voltage of the battery. Stop charging the battery if it exceeds this value. It is also the overcharge protection voltage value.
6.2>.Lower Limit Voltage Value dn: Battery allowed minimum voltage. Start charging the battery when the battery voltage is lower than this value.
6.3>.Charging Time OP:
6.3.1>.Set battery charging time.
6.3.2>.Turn ON charging time control function when the OP parameter value is more then 00:00. Minimum set time value 1minute.
6.3.3>.Turn OFF OP control if set 00:00.
6.3.4>.Start the timer when turn on output to start charging.
6.3.5>.Module turn OFF output to complete a charging process when timing is completed.
6.3.6>.Module automatically turns OFF charging time control function if battery voltage is less than the Lower Limit Voltage Value dn and flashing H:ER that means the unreasonable time parameter setting. It means insufficient charging and needs to continue charging the battery. Press any key to stop flashing.
6.3.7>.Record and display charging time if disabled Charging Time OP when short press button SET. Clear time if at next charging or exit charging time display interface.
6.4>.Turn ON Delay Time dOP: Set the delay interval between the first and the second charging. The time range is 0~999second.
6.Discharging Control OUT Mode:
1>.Input terminal connect 1pcs DC 6V-60V battery.
2>.Output terminal connect suitable load. Note the output voltage is same to battery.
3>.Output turn ON and the battery starts to discharging if battery voltage is more than the Upper Limit Voltage Value UP.
4>.Output turn OFF and the battery stops to discharging if battery voltage is less then the Lower Limit Voltage Value dn.
5>.The symbol OUT will flashing when discharging.
6>.Support set parameters:
6.1>.Upper Limit Voltage Value UP: Threshold value to allow battery discharge.
6.2>.Lower Limit Voltage Value dn: Battery allowed minimum voltage. Stop discharging when the battery voltage is lower than this value. It is also the over-discharge protection voltage value.
6.3>.Discharging Time OP:
6.3.1>.Set battery discharging time.
6.3.2>.Turn ON discharging time control function when the OP parameter value is more then 00:00. Minimum set time value 1minute.
6.3.3>.Turn OFF OP control if set 00:00.
6.3.4>.Start the timer when turn on output to start discharging.
6.3.5>.Module turn OFF output to complete a discharging process when timing is completed.
6.3.6>.Module automatically turns OFF discharging time control function if battery voltage is more than the Upper Limit Voltage Value UP and flashing H:ER that means the unreasonable time parameter setting. Press any key to stop flashing.
6.3.7>.Record and display discharging time if disabled Discharging Time OP when short press button SET. Clear time if at next discharging or exit discharging time display interface.
6.4>.Turn ON Delay Time dOP: Set the delay interval between the first and the second discharging. The time range is 0~999second.
6.5>.Discharge Turn ON Forced Start Time FOP:
6.5.1>.This function is used to prevent the device from starting instantly and reduce the battery voltage, so that it is lower than the Lower Limit Voltage Value dn and causing the module to automatically turn off the output and causing the battery can not discharge properly.
6.5.2>.The module will check the battery voltage again if enabled Discharge Turn ON Forced Start Time function.
7.Button Description:
1>.Long press means need keep press for more than 5second.
2>.UP button:
2.1>.Short press to switch display charging/discharging time and battery voltage percentage.
2.2>.Long press to switch work mode. IN is Charging mode and OUT is Discharging mode.
2.3>.Short/Long press to increase parameter value at parameter set mode.
3>.DOWN button:
3.1>.Short press to turn ON/OFF output.
3.2>.Long press to turn ON/OFF display status L-P (power saving mode):
3.2.1>.ON: Turn ON power saving mode. The display screen will turn OFF after 5~10minutes.Press any button to resume display.
3.2.2>.OFF: Turn OFF power saving mode. The display screen will keep ON all the time.
3.3>.Short/Long press to decrease parameter value at parameter set mode.
4>.SET button:
4.1>.Short press to automatically switch/query display parameters UP/dn/OP/DOP at charging mode and UP/dn/OP/DOP/FOP at discharging mode in normal display interface. Short press to switch select parameter set in parameter set mode.
4.2>.Long press to enter into parameter set mode.
4.3>.Keep press about 5second to save parameter values.
8.Use steps:
1>.Connect right input voltage at VIN+ and VIN-.
2>.Long press button SET to select work mode.
3>.Short press button SET to switch parameters.
4>.Short/Long press UP/DOWN to increase/decrease parameter value.
5>.Keep press about 5second to save parameter values.
6>.Remove input and connect load.
7>.Connect right input voltage at VIN+ and VIN- again.
9.Application:
1>.Load tester
2>.Circuit tester
3>.Battery discharge tester
4>.Factory equipment inspection
5>.Ordinary load tester
6>.Power supply aging tester
7>.Auxiliary measurement charger Output current capability
8>.Charger Factory Batch Aging test use
10.Note:
1>.Load terminal can not short circuit.
2>.It is a charging/discharging controller but not a charger!
3>.It can not be used as a charger!
4>.Please read use manual and description before use.
11.Frequency asked questions:
1>.What is the control voltage range? What is the applicable battery range?
Q: Control voltage range is DC 6V-60V. But battery voltage max is 48V. Because the voltage of 48V battery is 60V after fully charged.
2>.Why relay is automatically turned on and off continuously after power on and flashing light?
Q: This is because your charging current is too large or the battery capacity is too small that cause the battery voltage to immediately exceed the Lower limit voltage 'dn' value and then relay will OFF.But the voltage drops quickly to the Lower limit voltage 'dn' after Relay OFF and then start to charging.Cycle and cycle.
At this point you have to reduce the charging current.Usually the charging current is 10-15% of the battery capacity.For example, if the battery capacity is 20AH, the charging current is 2-3A.
Note that high current charging can cause the battery to heat up, aging, bulging or even exploding.
3>.What control method?
Q: This is the voltage control.For example:Lower limit voltage 'dn' is set to 12.0V.Upper limit voltage 'UP' is set to 14.5V.It will close output when the voltage is charged to 14.5V.Relay will ON and begins to charge when the voltage is reduced to 12.0V.
4>.Can it be automatically cycled?
Q: Yes,it can.Voltage control mode only controls turn-off and turn-on.
5>.Can it limit the current?
Q: It can't limit current, the charging current is completely dependent on your charger.
6>.Can I charge a 24V battery by inputting 12V?Or charge a 12V battery by inputting 48V?
Q: This is a simple voltage controller just for ON/OFF.It can not change output voltage.So what kind of charger should you prepare for charging the battery!
Package Included:
1 x CD60L Solar Battery Charger Controller 12V 24V 48V Charging Discharge Control
Instructions/schematics are NOT included. We don't provide technical assistance please make sure that you are familiar with the product before purchasing


